iPython hacking on Bluemix
- Published:
- categories: ibm
- tags: bluemix, python, ipython, nasa, astropy, ibm
Just saw a post about the upcoming NASA hackday and starting thinking what would be some useful stuff to have ready to run in Bluemix? I find that playing around with Python is a good way to start and you can look at projects liks Astropy.org for examples, but a really fun way to get started is using iPython notebooks, they allow you to essentially document, run, and save your code snippets in a web based version of the interpreter.
So I wanted to show what it takes to get that running in Bluemix, here there was an existing tutorial by Peter Parante on DW from last August this is helpful but using the Heroku buildpack since a Python buildpack did not exist on Bluemix then. So we’ll use that example but use the IBM buildpack and add some Astropy.org goodies to get started :)
Short Version

Long Version
Flow
- Setup our Bluemix Application
- Setup our Git Repository
- Update our Application’s Python environment
- Admire our work and learn more
- Caveats
Setup our Bluemix Application
So fire up your browser and cf command line to get this party started. First go to Bluemix in your browser, for my example I created a new space to play around in, but you just need to get somewhere you have access to create applications. And create a new application, Web, and select Python.
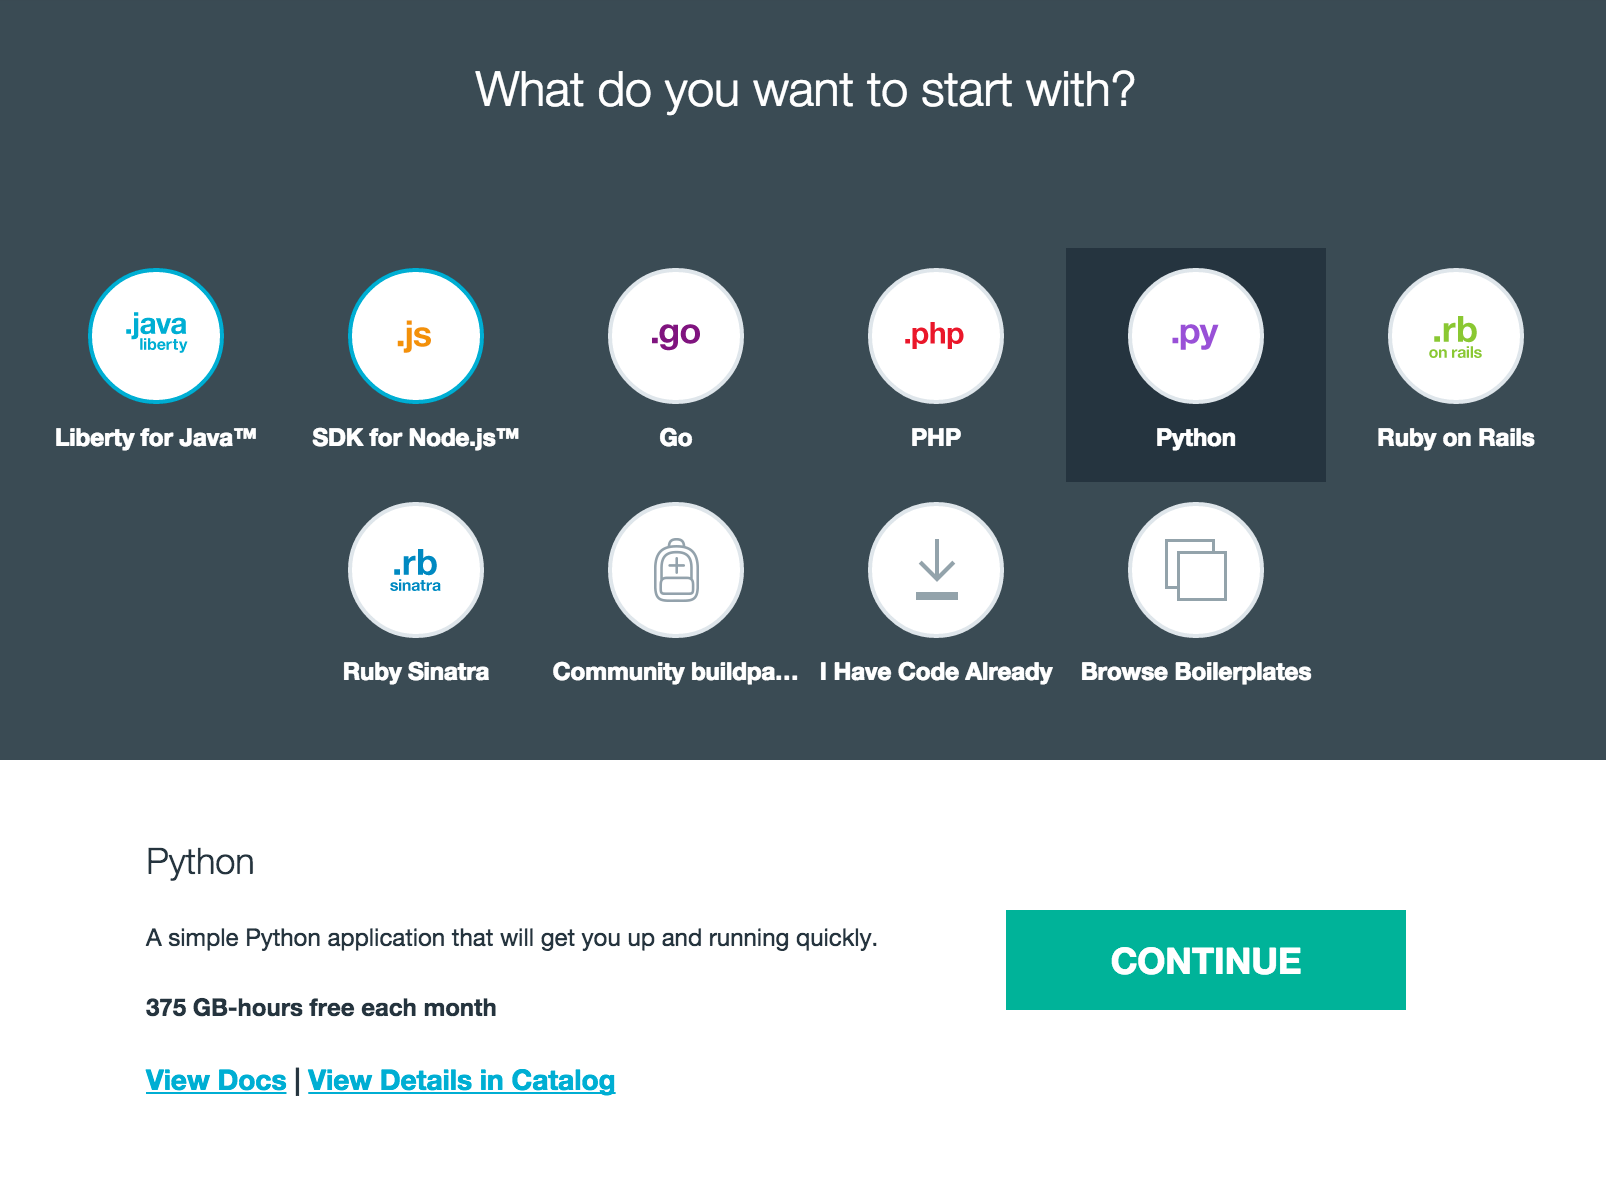
Give your application a name, and once that completes you will get a chance to download you starter code.or if you want to use DevOps Services and Git skip the download for now and go to the next section.
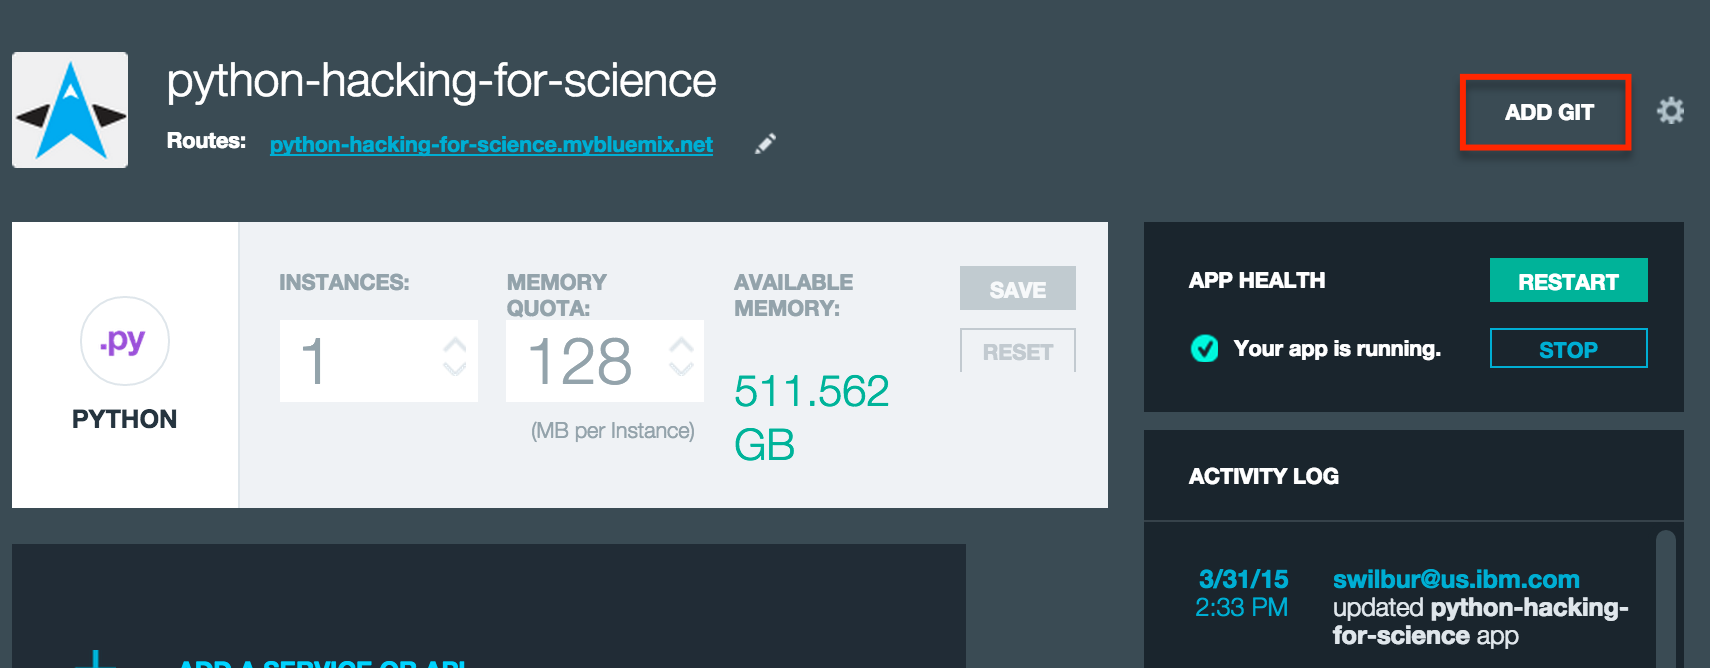
You can also checkout the application running live http://python-hacking-for-science.mybluemix.net/ and you should see the default boilerplate welcome page that we look at later.
Setup our Git Repository
If you want to use DevOps Service you can switch tabs and push git and use your git commands to clone locally. Or if you want to setup git elsewhere.
In my case I just waited until the application was running and created a git repository from the Application page for clarity.
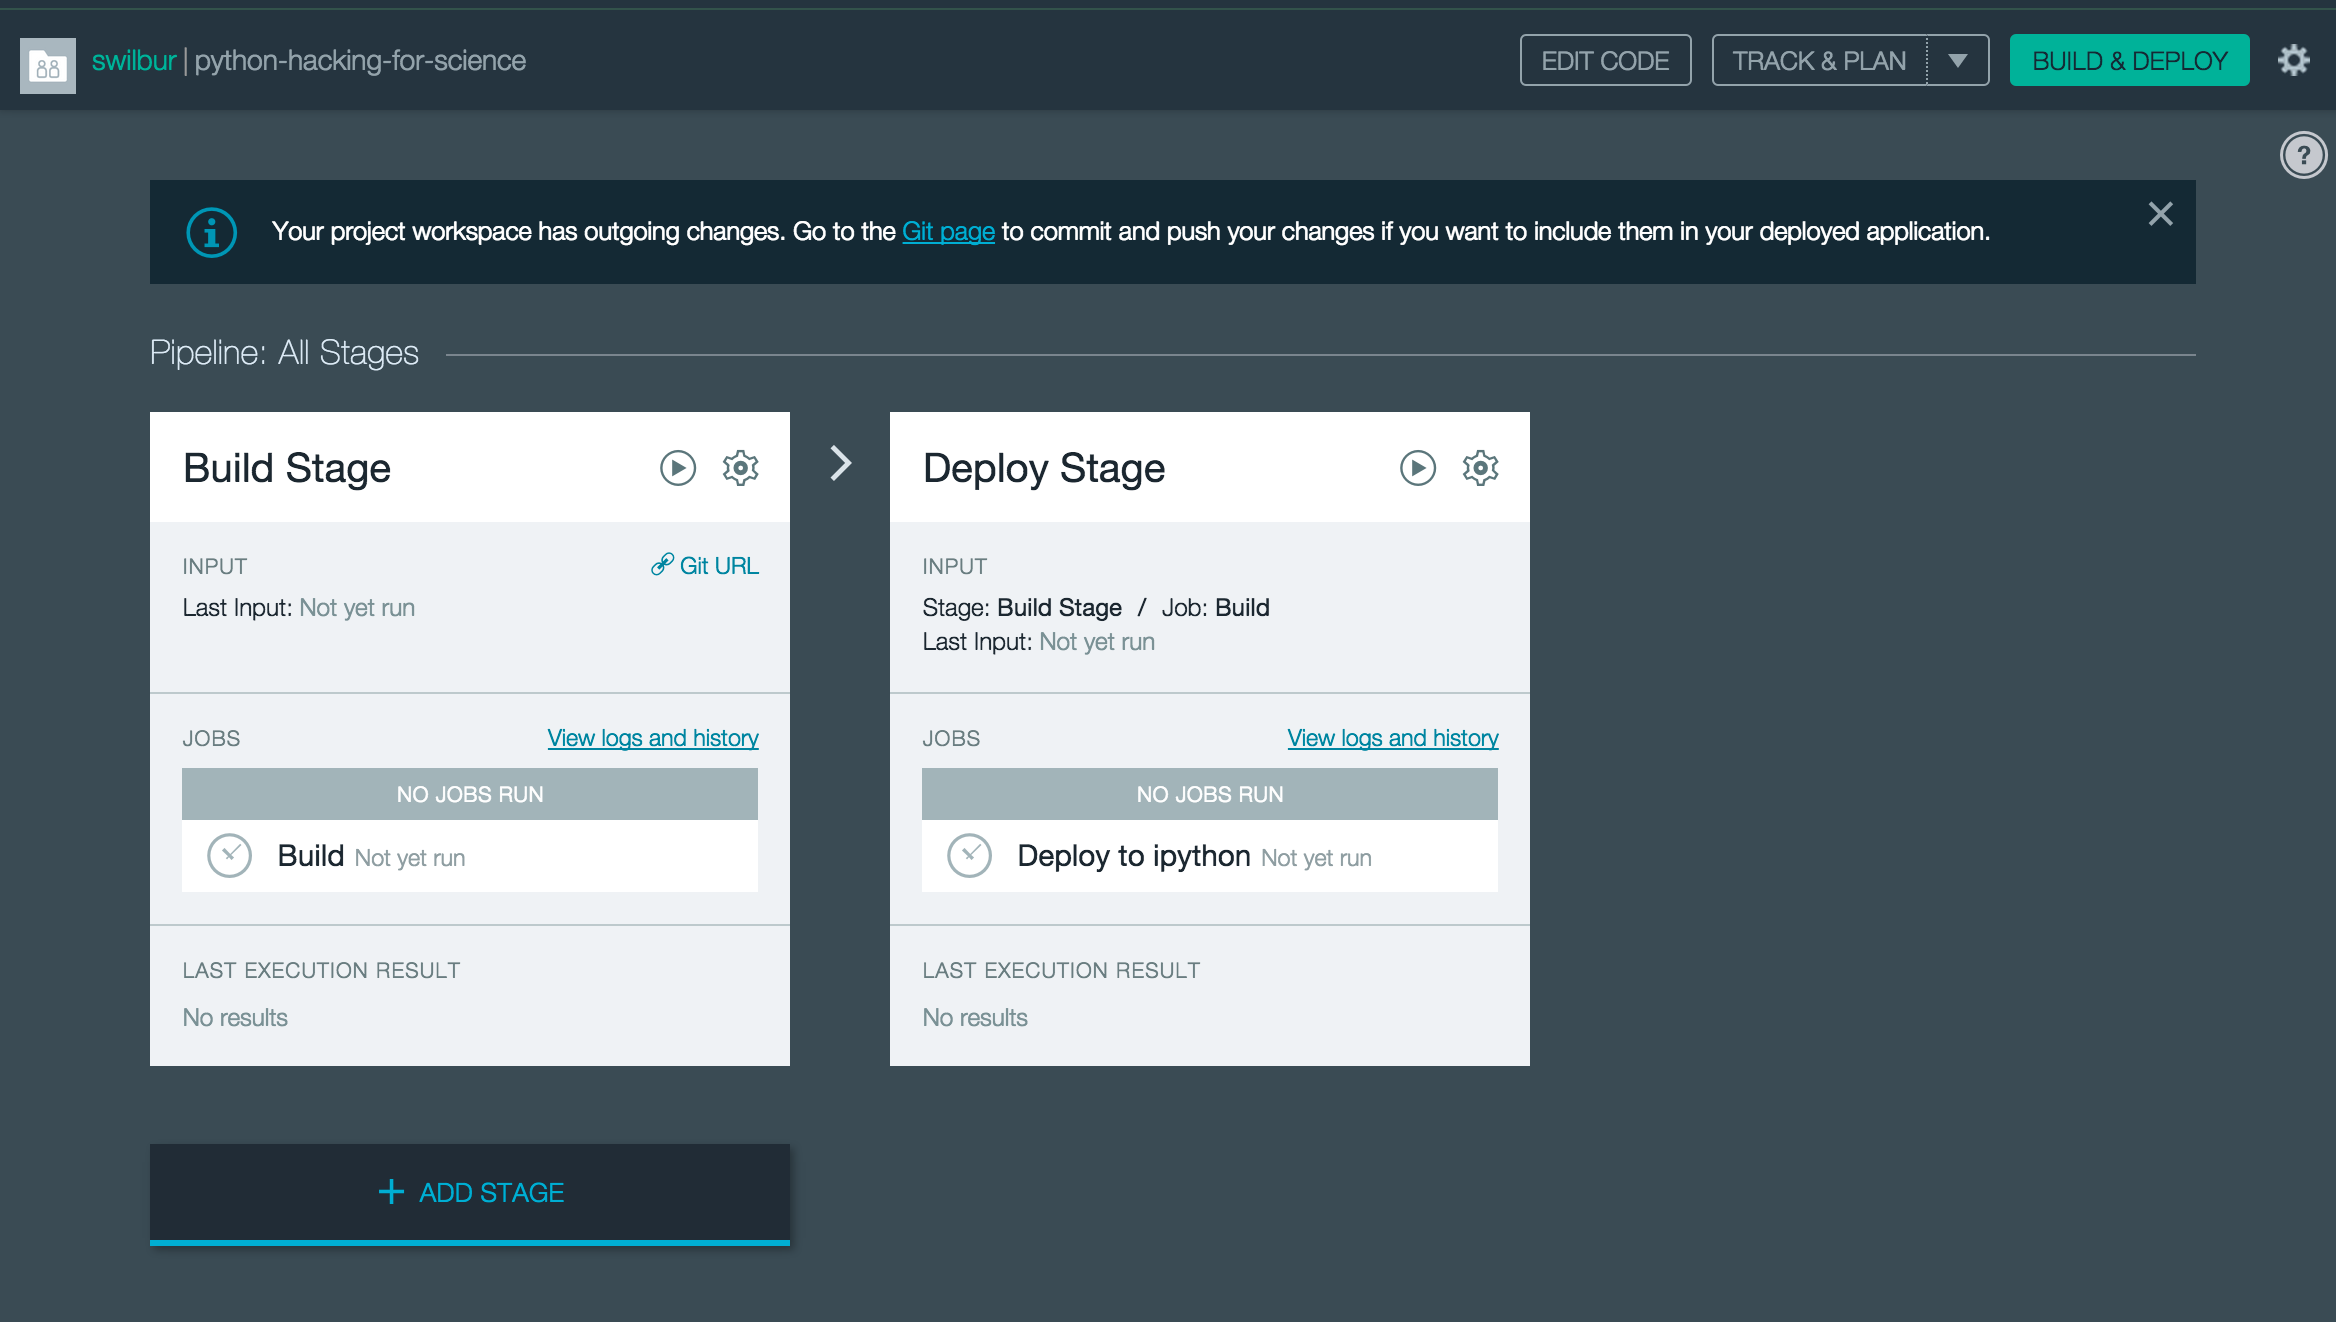
At the prompt you want to accept the defaults, as this will add the started application code we could have downloaded above to seed the repository and enable the Continuous Delivery Pipeline so we can have autodeploy on commit as we make changes later.
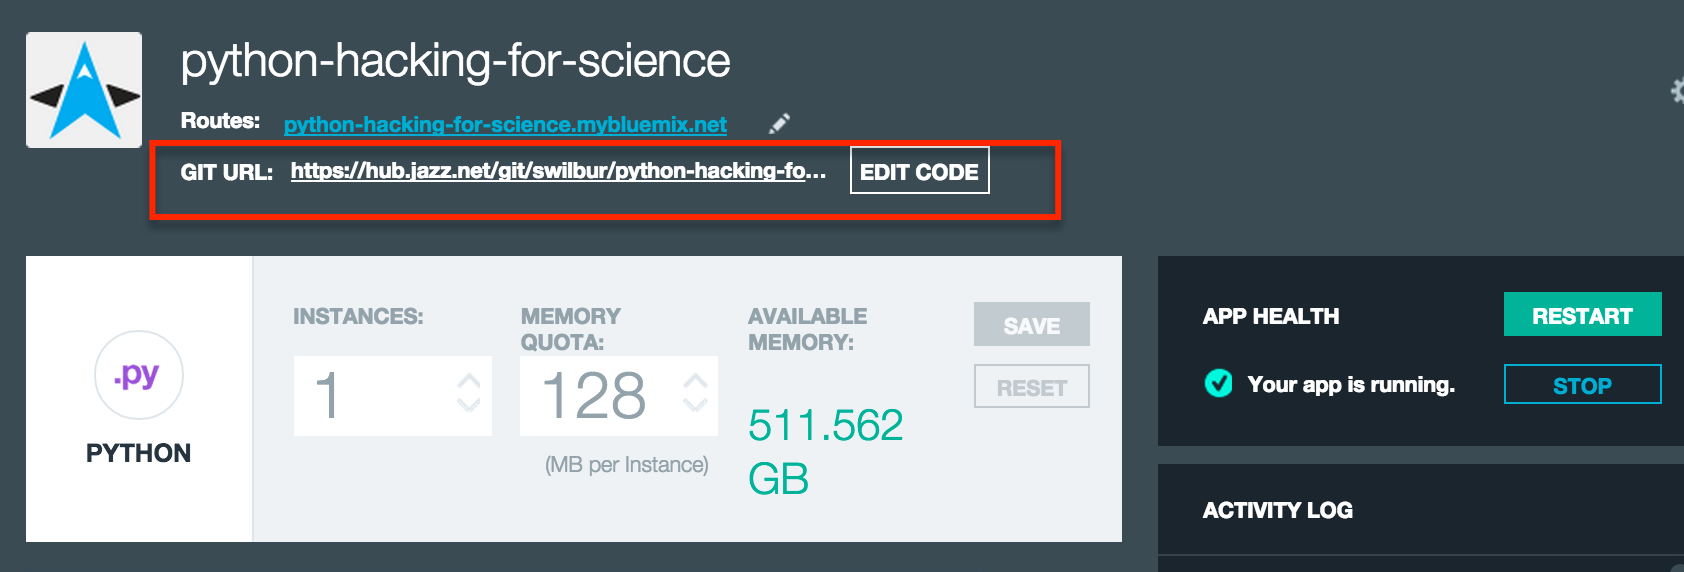
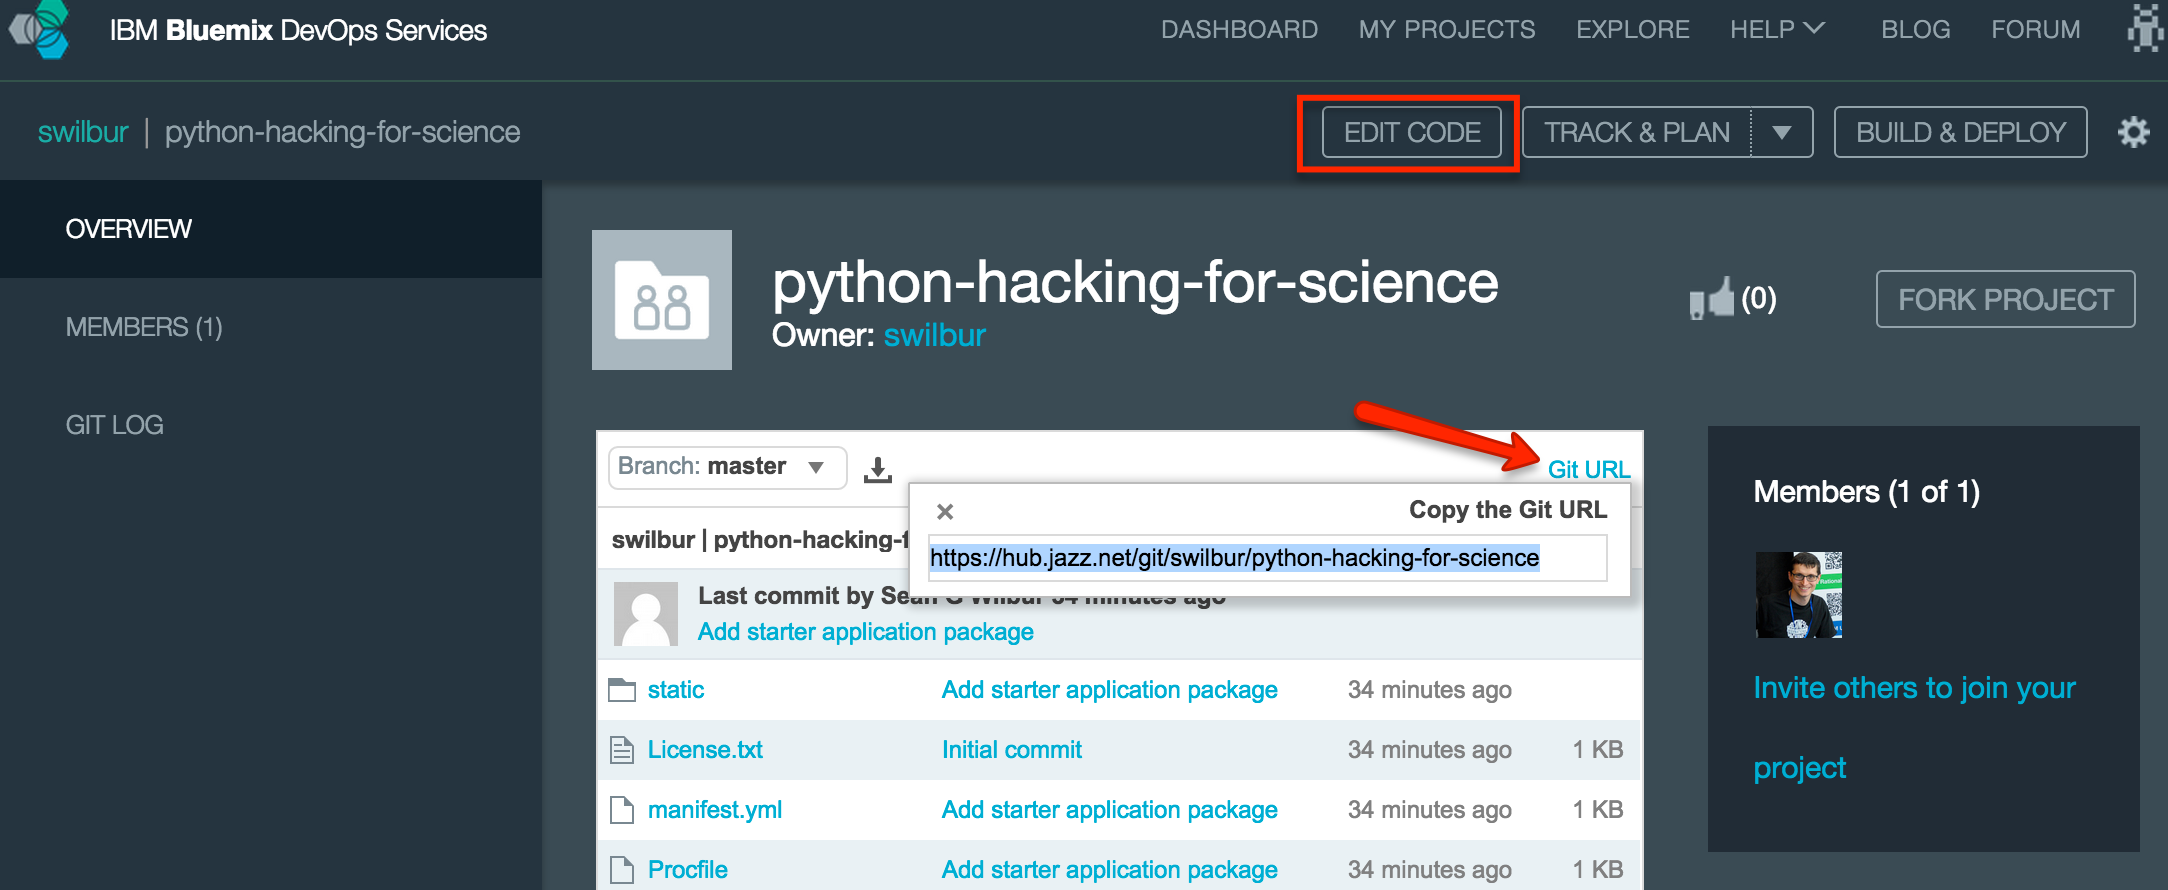
At this point I we can navigate to the git url listed on our newly created DevOps Services project swilbur/python-hacking-for-science. Once there you can either grab your git url and clone a local copy of your repo, or just hit the Edit Code button and start working in the web.
If you use the Edit Code feature all work is done inside the browser and you can directly sync your changes to a Bluemix application to redeploy any changes you make, good for content updates, not good while we make changes to the underlying configuration of the CloudFoundry Droplet so let’s hold off on that for this time.
The last thing to note, as part of our new project the integration setup an initial Continuous Delivery Pipeline that will auto-build on commit, and auto-deploy successful builds. We can turn this off or make changes but what this means is that we will automatically deploy any changes that we commit, since our build process is trivial it will never fail.
Update our Application’s Python environment
Now we should have a working starting point( either zip or git clone of repo), a running application, and we can open our favorite editor to start making changes push them back to cf and confirm they are working.
So unzip or clone your starter content.
sgwilbur@gura:~/workspaces$ mkdir python-hacking-for-science_fromzip
sgwilbur@gura:~/workspaces$ cd python-hacking-for-science_fromzip
sgwilbur@gura:~/workspaces/python-hacking-for-science_fromzip$ unzip ~/Downloads/python-hacking-for-science.zip
Archive:  /Users/sgwilbur/Downloads/python-hacking-for-science.zip
  inflating: Procfile
  inflating: static/images/newapp-icon.png
  inflating: static/index.html
  inflating: static/stylesheets/style.css
  inflating: server.py
  inflating: requirements.txt
  inflating: manifest.yml
  inflating: README.txt
sgwilbur@gura:~/workspaces/python-hacking-for-science_fromzip$ ls
Procfile         README.txt       manifest.yml     requirements.txt server.py        static
or
sgwilbur@gura:~/workspaces$ git clone https://hub.jazz.net/git/swilbur/python-hacking-for-science
Cloning into 'python-hacking-for-science'...
remote: Counting objects: 17, done
remote: Finding sources: 100% (17/17)
remote: Total 17 (delta 0), reused 17 (delta 0)
Unpacking objects: 100% (17/17), done.
Checking connectivity... done.
sgwilbur@gura:~/workspaces$ cd python-hacking-for-science/
sgwilbur@gura:~/workspaces/python-hacking-for-science$ ls
License.txt      Procfile         README.md        README.txt       manifest.yml     requirements.txt server.py        static
The only different is that IBM DevOps Services has added License.txt and README.md files, nothing functionaly different.
sgwilbur@gura:~/workspaces$ diff -d python-hacking-for-science_fromzip/ python-hacking-for-science
Only in python-hacking-for-science: .git
Only in python-hacking-for-science: License.txt
Only in python-hacking-for-science: README.md
Common subdirectories: python-hacking-for-science_fromzip/static and python-hacking-for-science/static
Of the files that are in the boiler plate project we are immediately concerned with 3 of them right now:
-
manifest.ymlOur definition of the application resources, routes, and dependencies from the Cloud Foundry Side.applications: - disk_quota: 1024M buildpack: python_buildpack host: python-hacking-for-science name: python-hacking-for-science path: . domain: mybluemix.net instances: 1 memory: 256M -
requirements.txtOur Python specific requirements, what modules we are going to use.ipython[notebook] matplotlib -
ProcfileThe start command to run our process (Update the Profile with a slight variation on the mouthful below as Peter added to his article).web: ipython profile create; echo "c.NotebookApp.password = '$( python -c 'from IPython.lib import passwd; import os; print passwd(os.environ.get("PASSWORD", ""))' )'" >> ~/.ipython/profile_default/ipython_notebook_config.py; cd content; ipython notebook --port=$VCAP_APP_PORT --ip=$VCAP_APP_HOST --no-mathjax
You can take a look at the boiler plate options and see it is pretty simple, now we are ready to push these to Bluemix, the first time this will build a lot of stuff since the numeric libraries for ipython and matplotlib are heavily reliant on C code under the covers, so run the push command and go grab a cup of coffee or snack:
sgwilbur@gura:~/workspaces/python-hacking-for-science$ cf push
Using manifest file /Users/sgwilbur/workspaces/python-hacking-for-science/manifest.yml

Updating app python-hacking-for-science in org swilbur@us.ibm.com / space ipython as swilbur@us.ibm.com...
OK

Using route python-hacking-for-science.mybluemix.net
Uploading python-hacking-for-science...
Uploading app files from: /Users/sgwilbur/workspaces/python-hacking-for-science
Uploading 19.6K, 12 files
Done uploading
OK

Stopping app python-hacking-for-science in org swilbur@us.ibm.com / space ipython as swilbur@us.ibm.com...
OK

Starting app python-hacking-for-science in org swilbur@us.ibm.com / space ipython as swilbur@us.ibm.com...
-----> Downloaded app package (20K)
-----> Downloaded app buildpack cache (31M)
-------> Buildpack version 1.1.1
-----> Installing dependencies with pip
       Downloading/unpacking ipython[notebook] (from -r requirements.txt (line 1))
       Downloading/unpacking matplotlib (from -r requirements.txt (line 2))
         Running setup.py (path:/tmp/pip_build_vcap/matplotlib/setup.py) egg_info for package

       ... CUT OUT LOTS OF LINES OF SCROLLING ...

       Successfully installed ipython matplotlib terminado mistune pygments tornado jinja2 pyzmq jsonschema numpy six python-dateutil pytz pyparsing nose mock ptyprocess certifi backports.ssl-match-hostname markupsafe
       Cleaning up...

-----> Uploading droplet (95M)

0 of 1 instances running, 1 starting
0 of 1 instances running, 1 starting
0 of 1 instances running, 1 starting
0 of 1 instances running, 1 starting
1 of 1 instances running

App started


OK

App python-hacking-for-science was started using this command `ipython profile create; echo "c.NotebookApp.password = '$( python -c 'from IPython.lib import passwd; import os; print passwd(os.environ.get("PASSWORD", ""))' )'" >> ~/.ipython/profile_default/ipython_notebook_config.py; ipython notebook --port=$VCAP_APP_PORT --ip=$VCAP_APP_HOST --no-mathjax`

Showing health and status for app python-hacking-for-science in org swilbur@us.ibm.com / space ipython as swilbur@us.ibm.com...
OK

requested state: started
instances: 1/1
usage: 512M x 1 instances
urls: python-hacking-for-science.mybluemix.net
last uploaded: Tue Mar 31 21:11:59 +0000 2015

     state     since                    cpu    memory           disk           details
#0   running   2015-03-31 04:26:22 PM   0.0%   113.4M of 512M   266.6M of 1G
Then 10 or 15 minutes later you will hopefully get this nice message taht your app is done building and is running! Thankfully this stuff gets cached so if you want to make a change or add another module it is only the time required to add the new modules not to rebuild them all again.
Lets take a minute to cleanup our boilerplate and commit our changes, then we can head over to the IDS project and checkout the CD pipeline kicking in.
sgwilbur@gura:~/workspaces/python-hacking-for-science$ git status
On branch master
Your branch is up-to-date with 'origin/master'.
Changes not staged for commit:
(use "git add <file>..." to update what will be committed)
(use "git checkout -- <file>..." to discard changes in working directory)
modified: Procfile
modified: manifest.yml
modified: requirements.txt
no changes added to commit (use "git add" and/or "git commit -a")
sgwilbur@gura:~/workspaces/python-hacking-for-science$ ls -als
total 48
0 drwxr-xr-x+ 11 sgwilbur staff 374 31 Mar 17:12 .
0 drwxr-xr-x+ 70 sgwilbur staff 2380 31 Mar 15:24 ..
0 drwxr-xr-x+ 13 sgwilbur staff 442 31 Mar 17:12 .git
8 -rw-r--r--+ 1 sgwilbur staff 69 31 Mar 15:23 License.txt
8 -rw-r--r--+ 1 sgwilbur staff 310 31 Mar 16:59 Procfile
8 -rw-r--r--+ 1 sgwilbur staff 914 31 Mar 15:23 README.md
0 drwxr-xr-x+ 2 sgwilbur staff 68 31 Mar 16:59 content
8 -rw-r--r--+ 1 sgwilbur staff 198 31 Mar 16:11 manifest.yml
8 -rw-r--r--+ 1 sgwilbur staff 28 31 Mar 16:11 requirements.txt
8 -rw-r--r--+ 1 sgwilbur staff 603 31 Mar 15:23 server.py
0 drwxr-xr-x+ 5 sgwilbur staff 170 31 Mar 15:23 static
sgwilbur@gura:~/workspaces/python-hacking-for-science$ git add Procfile
sgwilbur@gura:~/workspaces/python-hacking-for-science$ git add manifest.yml
sgwilbur@gura:~/workspaces/python-hacking-for-science$ git add requirements.txt
sgwilbur@gura:~/workspaces/python-hacking-for-science$ git rm README.txt
rm 'README.txt'
sgwilbur@gura:~/workspaces/python-hacking-for-science$ git rm server.py
rm 'server.py'
sgwilbur@gura:~/workspaces/python-hacking-for-science$ git rm -rf static/
rm 'static/images/newapp-icon.png'
rm 'static/index.html'
rm 'static/stylesheets/style.css'
sgwilbur@gura:~/workspaces/python-hacking-for-science$ git status
On branch master
Your branch is up-to-date with 'origin/master'.
Changes to be committed:
(use "git reset HEAD <file>..." to unstage)
modified: Procfile
deleted: README.txt
modified: manifest.yml
modified: requirements.txt
deleted: server.py
deleted: static/images/newapp-icon.png
deleted: static/index.html
deleted: static/stylesheets/style.css
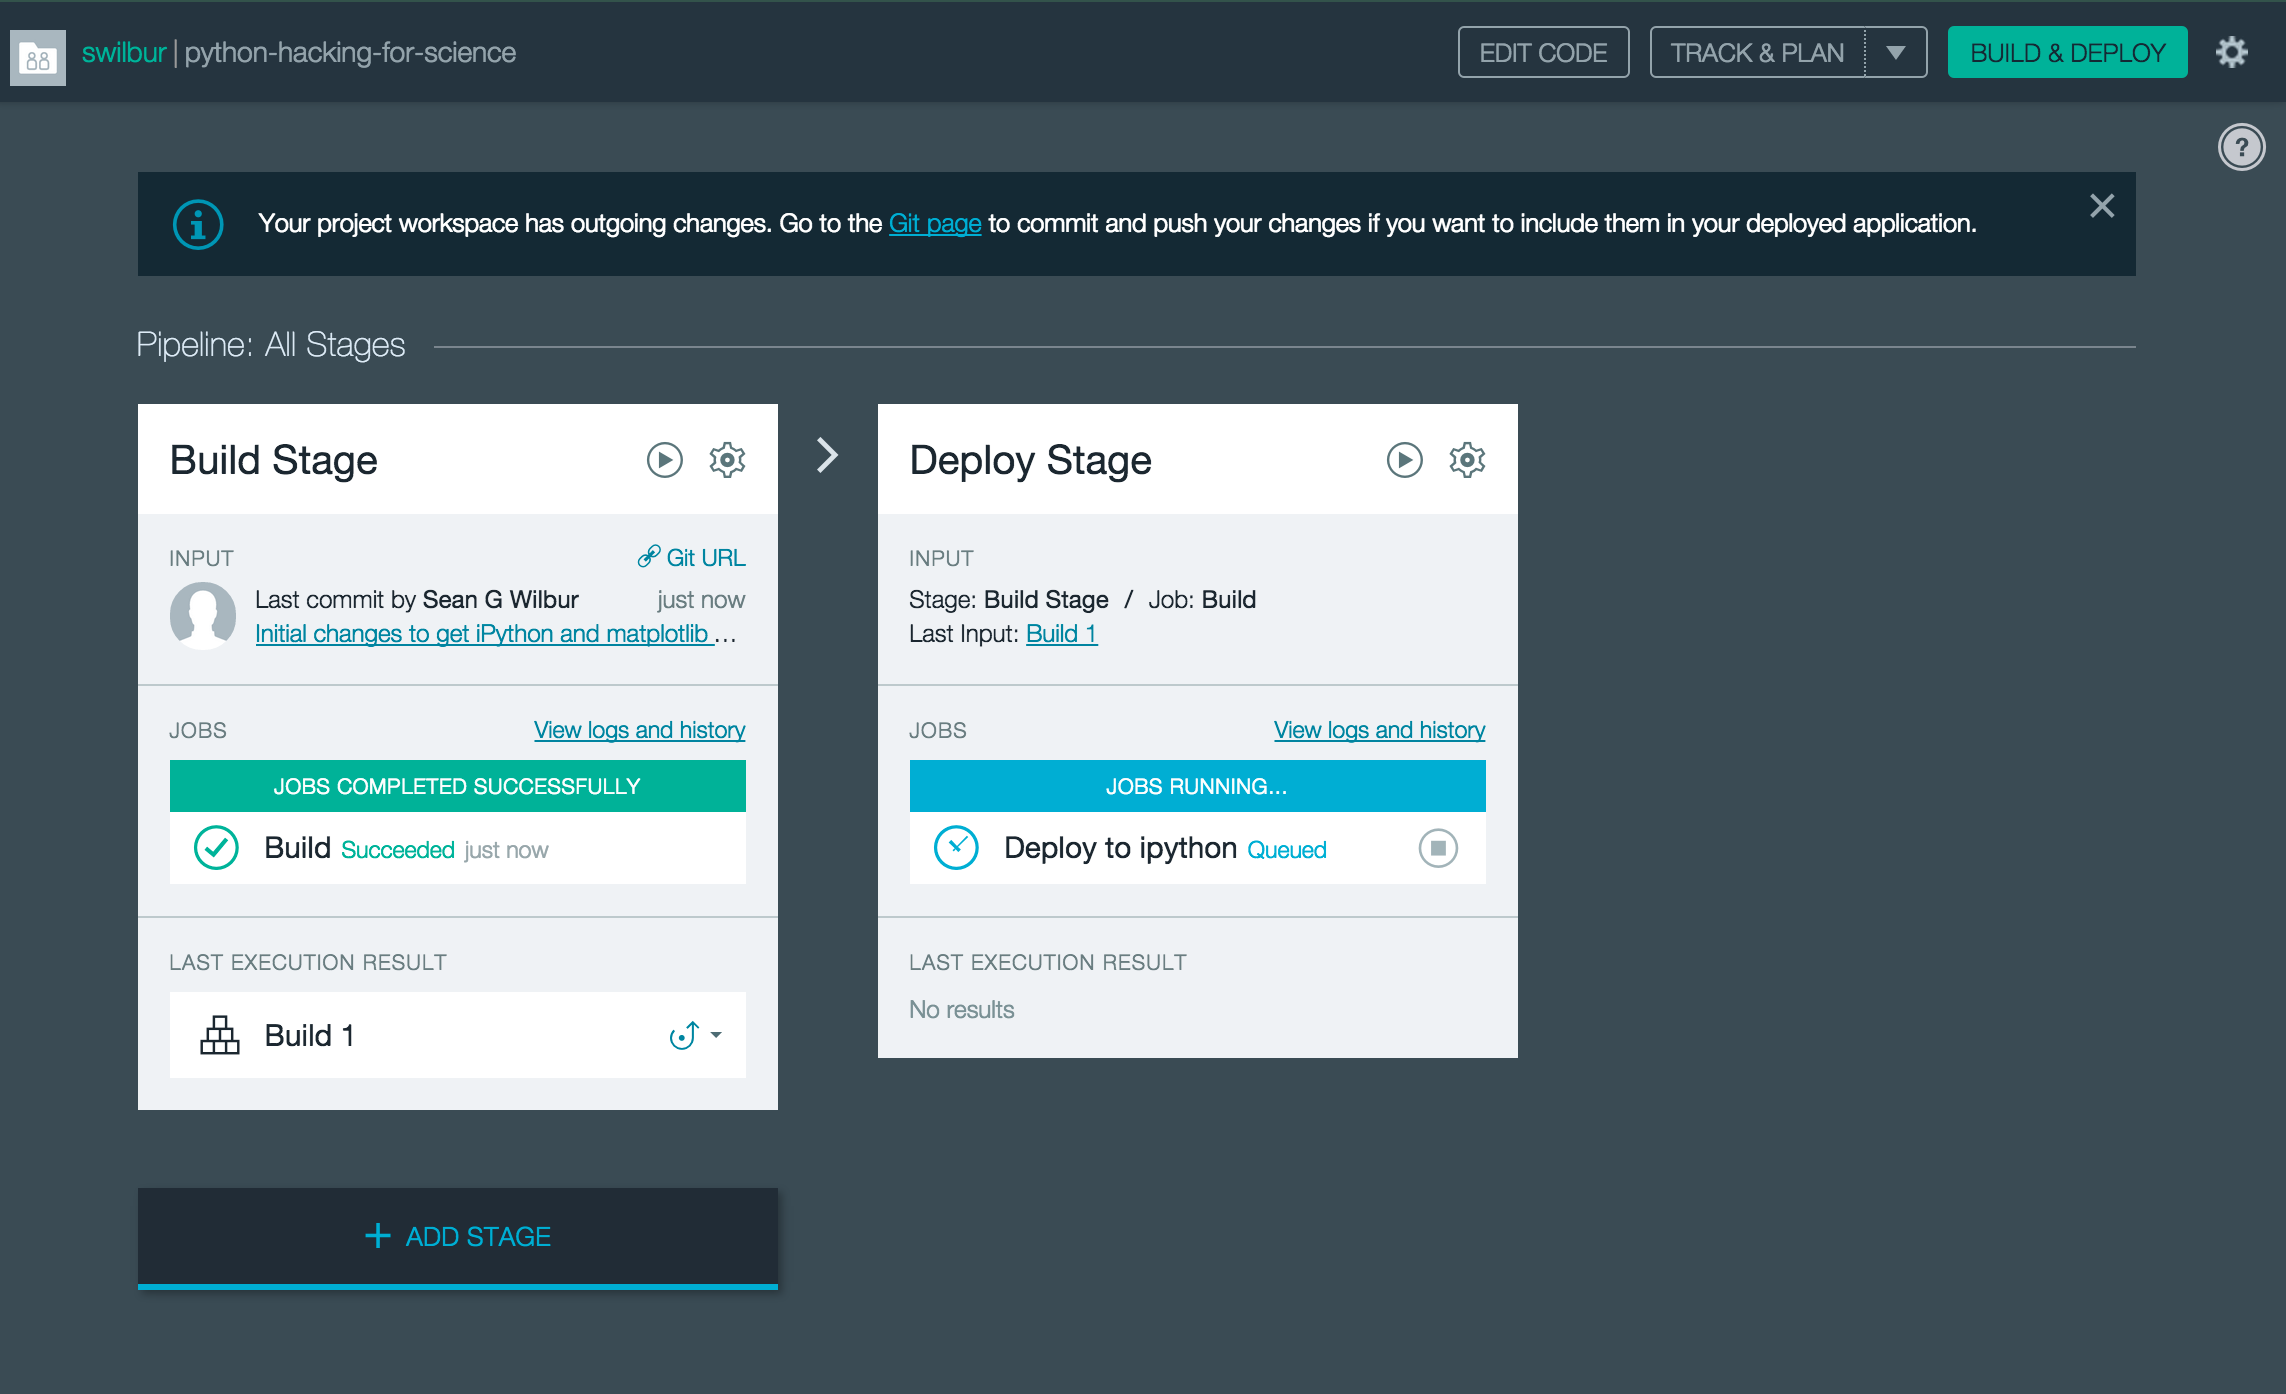
sgwilbur@gura:~/workspaces/python-hacking-for-science$ git commit -m "Initial changes to get iPython and matplotlib running on Bluemix."
[master ad5b567] Initial changes to get iPython and matplotlib running on Bluemix.
8 files changed, 4 insertions(+), 158 deletions(-)
delete mode 100644 README.txt
delete mode 100644 server.py
delete mode 100644 static/images/newapp-icon.png
delete mode 100644 static/index.html
delete mode 100644 static/stylesheets/style.css
sgwilbur@gura:~/workspaces/python-hacking-for-science$ git push origin master
Counting objects: 10, done.
Delta compression using up to 4 threads.
Compressing objects: 100% (4/4), done.
Writing objects: 100% (5/5), 724 bytes | 0 bytes/s, done.
Total 5 (delta 1), reused 0 (delta 0)
remote: Resolving deltas: 100% (1/1)
remote:
remote: Processing changes: refs: 1, done
To https://hub.jazz.net/git/swilbur/python-hacking-for-science
270280a..ad5b567 master -> master
Now if you are quick enough or just have the browser open already you will see the pipeline kick in.
Next Steps
Take a look at the iPython tutorial which can be run from this web notebook without having to install it all locally.
PyCon 2014 In Depth iPython with creator Fernando Perez
Take a look at the astropy.org/astropy-tutorials/ on how to get started, you will see that there tuturials are actually iPython notebooks :)
Caveats
Nothing is persisted here, we are only ever writing to the runtime droplet and never committing those files back to git, so keep this in mind that the work is throw away and will not survive re-deployments.
Running this on a public server that you are paying for computer and memory usage on, it is not wise to leave it un protected like this so it is recommended that you setup a password or change the default password from blank as shown here when it is running on your Credit Card :)
This is not an ideal location for large data set calculation due to the potential memory requirements, but it is an easy way to get started with iPython and a few modules you are interested in within the hour.